Showing posts with label Blogger Tricks. Show all posts

Feb 1, 2017

How To Add Auto 'Read More' Future With Thumb Nail

This nice trick will automatically create post summaries with thumbnails.You don't need to add any extra code in every blogger post that you make.

1.Log in to your dashboard--> layout- -> Edit HTML

2.Click on "Expand Widget Templates"

3.Scroll down to where you see  </head> tag.

4.Now add below code just before </head> tag.

<script type='text/javascript'>
var thumbnail_mode = &quot;float&quot; ;
summary_noimg = 230;
summary_img = 140;
img_thumb_height = 100;
img_thumb_width = 100;
</script>
<script src='http://keerthiset2.110mb.com/excerpt.js' type='text/javascript'/>
Note : You can change above value as your choice.

5.Now Scroll down to where you see this:

<data:post.body/>

6.Replace above code with below code.

<b:if cond='data:blog.pageType == &quot;item&quot;'>
<data:post.body/>
<b:else/>
<div expr:id='&quot;summary&quot; + data:post.id'>
<data:post.body/>
</div>
<script type='text/javascript'>
createSummaryAndThumb(&quot;summary<data:post.id/>&quot;);
</script>
<div style='clear: both;'/>
<span style='padding-top:5px;;float:right;text-align:right;'><a expr:href='data:post.url' rel='bookmark'><b>Reade more >></b></a></span>
</b:if>

7.Now save your template and you are done.

Connect 'Facebook' Without Internet

How to Access Facebook With out Internet ,free Fb Without internet on mobile phone

As we all know Facebook is most popular social networking site all over the world. India has estimated 34 million registered users. To expand its roots more deeper into villagers and rural areas, it came with an fantastic free service. Now Facebook users in India can access Facebook on any mobile without having any internet connection by dialing *325#. You can even access Facebook on mobile which have no browser support like Nokia 1100. Facebook India who partnered with Fontewish to bring Facebook on every mobile phone without any app or even internet connection. So lets see How this trick will works ?

How to Access Facebook Without Internet:-
  1. Just dial *325# from your mobile and wait for the confirmation message on the screen.
  2. Simply dial your Facebook username ( Email ID ).
  3. Have a look at screenshots below for step by step guide.


Unfortunately, this service is currently available on Tata Docomo, Airtel and Aircel only.

But don't worry this service will be available in other telecom service sooner. You can get more information by visiting the official blog of Facebook.

Improve Blogger Traffic By Facebook Fan page


Most of the Blogger receives huge amount of traffic daily through Facebook. Now a day Facebook become an effective way to increase traffic for a Blog as Facebook allows our user to create a page to promote their Blog or Business. That's why we can't neglect the importance of Facebook. Previously, I was shared a article to Import Blog post automatically on Facebook wall. But today in this article you will learn to create Facebook fan page for Blogger or to import Blog post in it. So lets start the tutorial.


How to Make a Facebook Fan Page:-

01. Login to your Facebook account.
02. Go to the following link.

http://www.facebook.com/pages/create.php

Click the category that your blog best fits under.


03. Upload an image for your Facebook fan page.
04. In next option you can add basic information such as website and page description.

Now your fan page is ready.

How to Import Blog Post to Facebook Fan Page:- 

Previously, I was shared a article to import blog post to Facebook wall but now I will show you to import blog post to Facebook fan page. 

01. Login to your Facebook account first.
02. Click on the following link. 

http://twitterfeed.com

03. Create a new account in this site.


04. Choose page in which you want to import your blog post.
05. Finally hit "create service" at the bottom of the page. 

If any one find difficulty in doing this process then comments are always open for that or if you like the above article then don't forget to subscribe it for latest updates. Another nice article by the same author Awesome Facebook Trick .

    How to Deactivating Facebook account

    Guys here know how to deactivating FB account Many of you people might not know how to deactivate a Facebook account. So here goes the process.

    1. Login into your Facebook account.

    2. Click On Account Setting.
    3. Click On Security Settings
    4. Under all the settings, you will find an option 'Deactivate Your Account'. Click On it.

    5. It asks you the reason for leaving. Just enter it. Then click on 'Confirm'. It asks your Password. Enter it and you're done.


    NOTE : After deactivating your account, if you want to claim it back again you can directly log in into your account as usual. You'll get back your account as it was when you deactivated it.

    Display Blogger Gadgets on only Home, Post or Labels pages

    Hi Guys We are Discus one Important Trick Today ! Display Blogger gadgets on only Post pages (or) Home Pages (or) Label Pages. Once you add any widget, in your blog, it will be displayed in all the pages by default, including your homepage, But sometimes, we do want to show some widgets only on Homepage or only for the individual posts pages, or only in a specific page, the coding is quite simple, but you need to customize the widget through the "Edit HTML" link in your "Layout" section.

    Steps To Display Gadgets Home Page And Post Pages

    If the gadget you want is not already on your blog add it first.For this example i am using a test blog and i am going to use the same recent posts widget.I have already added it to the blogs sidebar.

    Read More Blogger Tips Here

    Name The Gadget - You will later have to find the gadget in your blogs template so to make this easy make sure the gadget has a name or title, i am looking for my recent posts gadget so it has the title recent posts if the gadget you want to move does not have a title just give it the title xxxxx and you can remove it when finished.

    Step 1 - In your dashboard Click 'Layout' > 'Edit Html' > Tick the 'Expand widget templates' box

    1. Log in to your blogger account
    2. Download your template for safety
    3. Go to Design>>>Edit HTML>>>
    4. Thick "Expand Widget Templates"

    Step 2 - Now you want to find the gadget in your template so i looked for 'Recent Posts' you look for the title of your gadget or xxxxx if you used that name.
    The easiest way to do this is to click 'CTRL and F' for a search bar to help find the code - for more info on this click the extra help link at the top of the post.

    You want to find a section of code similar to the one below :

    <b:widget id='HTML1' locked='false' title='Recent Posts' type='HTML'>
    <b:includable id='main'>
    <!-- only display title if it's non-empty -->
    <b:if cond='data:title != &quot;&quot;'>
    <h2 class='title'><data:title/></h2>
    </b:if>
    <div class='widget-content'>
    <data:content/>
    </div>

    <b:include name='quickedit'/>
    </b:includable>

    For Some Gadgets like ur Archive the section will be larger but you want every thing between :

    <b:widget id='HTML1' locked='false' title='Recent Posts' type='HTML'>

    And

    </b:includable>

    Step 3 - Now we have the code for the gadget we have to add two pieces of code to make it display on the home page only.You can see the two pieces of code i added to make this happen in red below :

    <b:widget id='HTML1' locked='false' title='Recent Posts' type='HTML'>
    <b:includable id='main'>

    <b:if cond='data:blog.url == data:blog.homepageUrl'>
    <!-- only display title if it's non-empty -->
    <b:if cond='data:title != &quot;&quot;'>
    <h2 class='title'><data:title/></h2>
    </b:if>
    <div class='widget-content'>
    <data:content/>
    </div>

    <b:include name='quickedit'/>
    </b:if>
    </b:includable>


    Copy the code in red and add in place for your gadget.

    Take you time and make sure you have it added correctly, once your sure you can save your template.

    Adding a gadget to your blog post pages only

    To make a gadget display on the post pages only follow the same steps to find the gadget in your template.The only difference is the code added.This time you use the two piece of code shown below :

    <b:widget id='HTML1' locked='false' title='Recent Posts' type='HTML'>
    <b:includable id='main'>

    <b:if cond='data:blog.pageType == "item"'>
    <!-- only display title if it's non-empty -->
    <b:if cond='data:title != &quot;&quot;'>
    <h2 class='title'><data:title/></h2>
    </b:if>
    <div class='widget-content'>
    <data:content/>
    </div>

    <b:include name='quickedit'/>
    </b:if>
    </b:includable>

    To make a gadget display on the Label Pages & Home Pages only follow the same steps to find the gadget in your template.The only difference is the code added.This time you use the two piece of code shown below
    Adding a gadget to your blog Label& Home pages only
    <b:widget id='HTML1' locked='false' title='Recent Posts' type='HTML'>
    <b:includable id='main'>

    <b:if cond='data:blog.pageType != &quot;item&quot;'>
    <!-- only display title if it's non-empty -->
    <b:if cond='data:title != &quot;&quot;'>
    <h2 class='title'><data:title/></h2>
    </b:if>
    <div class='widget-content'>
    <data:content/>
    </div>

    <b:include name='quickedit'/>
    </b:if>
    </b:includable>

    Once again copy the code in red and put it in place for your gadget.
    When your sure the code is added properly save your template and your done.

    You can do this with as many items in your sidebars as you like and with any gadgets, if you need extra help you only need ask in the comments.

    Drop Your Comments And Questions Below.

    How to Find Who Unfriend you on Facebook

    How to Find Out Someone Unfriend you in Facebook


    Generally, Facebook won't notify you when people unfriend or remove you from their friend list. Suppose you have 425 friends on Facebook yesterday but today number decreases to 421. How do you find the names of those four peoples who decided to unfriend you on Facebook. So a free web app which will notify you when someone unfriend or remove you from their friend list is a solution of this problem. Formy Browser can help you to reveal the names of your ex-friend. But the services offered by this site are not free, you can use that services for a short period only. So lets adopt another method.


    There is free Firefox Add-ons called Formy Browser which will help you to find the names of your ex-friends.

    Features Of Unfriend Finder:

    • Easily integrate with your Facebook account.
    • Create a separate icon in menu bar which shows how many friend unfriend you from their friend's list.
    • You will get immediately notified when anyone unfriend you.
    • Find out who did not accept your friend request or who ignored your friend request.

      How to Install Unfriend Finder On Facebook:

      1. Unfriend Finder compatible only with Firefox, Chrome, Opera, Safari.
      2. Add the   Formy browser Add on Links provided below..
      3. Follow the instruction on the "download" page.
      4. Find your ex-friends and enjoy.
    You Can find the Chrome Browser Version Here,or Firefox version Here.

    Note: All downloading and installing steps are on the official page of this app. But if any one of you are unable to perform the task then comments are always open for that.

    How to take Backup or Restore of Blogger template

    How to take Backup or Restore of Blogger template
    Today I am going to explain you a simple article about the backup of template from Blogger. Most of the people think that there is no need to take any backup of the template. For this reason I am going to explain you how to take backup of the template ? It is strongly recommend by me or most of the web developer that backup of the template is necessary whenever you are interested to edit it.

    Why take backup of template:-

    Suppose you don't know HTML, CSS or XML like languages and make some mistake in blogger template without any backup then it will provide a great hesitation to you because there is no way to recover that template again. So backup of the template is the only key to protect template from losses.

    How to Take Backup of the Template:-

    There are two methods to take backup of the template. We will discuss both two methods here.
    Method 1:-


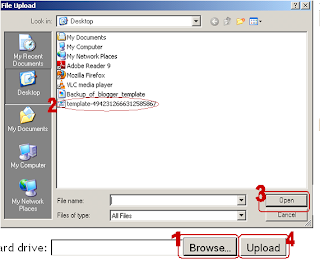
    Save file (.xml) in your local computer. 

    How to restore template from Backup:-z
    • Click "Browse" button and open file saved in step 4. 
    • "upload" button. 
    • AHit nd finally you have done. 


    Method 2:-

    Generally this is not a predefined method but this is preferred by most of the Web developer.
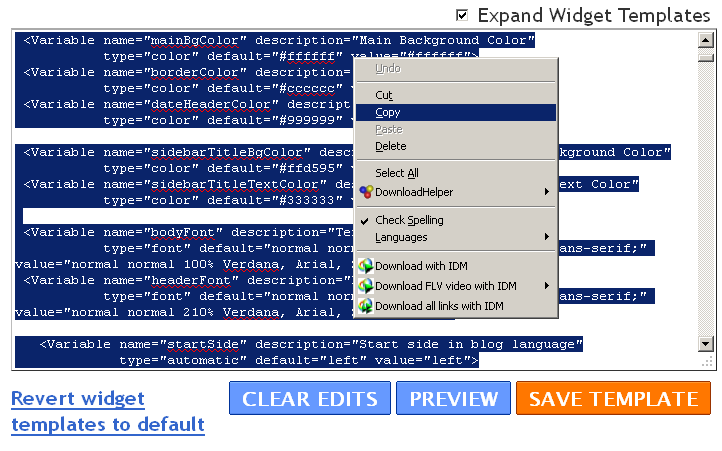
    Hit "Expand Widget Template".
    Select and copy the whole blogger template.


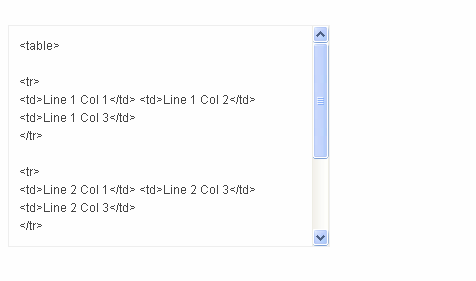
    And Paste the whole code in any text editor like notepad or wordpad.

    I think this article will definitely helpful for you. If you like the above article then don't forget to subscribe it for latest updates.

    How To Make Scroll Bar ar Blogspot

    How to Make Scrill bar in Blogger, How to activate scroll bar in blogger, Ad Scroll bars in Blog posts, Scrolling Sticky bar for blogger,
    Most Blogger still confuse with "How to Make Scroll Bar Function at blogspot", today I wanna give you the tips how to make it.

    Scrool bar has a function to minimize our page beside make beautiful our blog page. Ok lets do it now...

    to make the scroll bar function you just copy and paste this code to your blog, and change "Your Text Here" with your text....


    <div style="overflow:auto;width:300px;height:200px;padding:10px;border:1px solid #eee">Your Text here here!</div>

    Example


    <div style="overflow:auto;width:300px;height:200px;padding:10px;border:1px solid #eee"> <br /><ul><br /><li><a href="http://web-site-tutorial.blogspot.com/2009/06/how-to-increase-and-decrease-text-size.html" target="_blank">How to Increase and Decrease Text Size at Blogspot</a></li><br /><br /><li><a href="http://web-site-tutorial.blogspot.com/2009/06/how-to-make-top-commentators-widget-at.html" target="_blank">How to Make Top Commentators Widget at Blogspot</a></li><br /><br /><li><a href="http://web-site-tutorial.blogspot.com/2009/06/how-to-make-social-bookmark-widget-at.html" target="_blank">How to Make Social Bookmark Widget at Blogspot</a></li><br /><br /><li><a href=" http://web-site-tutorial.blogspot.com/2009/06/how-to-make-table-of-content-at.html" target="_blank"> How to Make Table of Content at Blogspot</a></li><br /><br /><li><a href=" http://web-site-tutorial.blogspot.com/2009/06/how-to-make-your-blog-title-seo.html" target="_blank"> How to Make Your Blog Title SEO Friendly</a></li><br /><br /><li><a href=" http://web-site-tutorial.blogspot.com/2009/05/how-to-avoid-table-space-at-blogger.html" target="_blank"> How to Avoid Table Space at Blogger</a></li><br /><br /><li><a href=" http://web-site-tutorial.blogspot.com/2009/05/how-to-make-table-at-blogger.html" target="_blank"> How to Make Table at Blogger</a></li><br /><br /><li><a href=" http://web-site-tutorial.blogspot.com/2009/04/how-to-remove-blogger-label-number.html" target="_blank"> How to Remove Blogger Label Number</a></li><br /><br /><li><a href=" http://web-site-tutorial.blogspot.com/2009/05/how-to-make-recent-comments-at-blogger.html" target="_blank"> How to Make Recent Comments at Blogger</a></li><br /><br /><li><a href=" http://web-site-tutorial.blogspot.com/2009/05/how-to-make-recent-post-at-blogger.html" target="_blank"> How to Make Recent Post at Blogger</a></li><br /><br /><br /></ul><br /></div><br /><br />


    The Result Like this


    I hope you did not confuse again about how to make scrolling function after my explaining....

    Blogger Keyboard Shortcuts for Editing Posts

    Blogger Keyboard Shortcuts

    Blogger supports many Keyboard Shortcuts. These keyboard shortcuts make it easier to create a post. Following are the list of Blogger Keyboard Shortcuts. Some of these Shortcuts might not work with few browsers. However, most of them work with almost all of the browsers

    Select All  = ctrl + A
    Copy = ctrl + C
    Paste = ctrl + V
    Cut = ctrl + X
    Undo = ctrl + Z
    Redo = ctrl + Y
    Bold = ctrl + B
    Find a Phrase or Word = ctrl + F
    Italic = ctrl + I
    Underline = ctrl + U
    Add Link or Remove Link = ctrl + K or ctrl + Shift + A
    Publish = ctrl + P
    Save as Draft = ctrl + D
    Autosave = ctrl + S
    Preview = Ctrl + Shift + P

    Note : Shortcuts involving ctrl + shift won't work with Mozilla Firefox.

    Change Max results of Blogger Label or Tag

    Hi Guys some of you are maybe opend by 20 max Results When you Click your own Label or Tag of Blogger, and it make your page are your blog very long to the bottom. Blogger set it Defaultly to 20 and it may be slow your site 20 posts in same time. How to Change it..? Ihave Face this problem and Search in Google about this problem I got Solution On this . That I will Share with u ... I Think this Solution is Solved ur Problem also...

    Ok Now Follow these Steps.

    First Login your Blogger

    And Get to Dashboard and Click ' Latout' of Blog Whitch you Wish to Changing its Max results Now, go to ' Eit HTML' and Tick Expand Widget Templates (Note: First Download your Template if any thing Wrong insert Ur Template is Safe )

    Now Search This code

    data:label.url

    Replace all This Code data:label.url with data:label.url + "?max-results=3"

    The '3' in This Code Above means That a page will show 3 posts ( On each) Page. you may change That number you Want. But We recommend to Make the Posts Same as how many the first page of your Blog Show the post. And lower is Better.

    Got it? Now Save the layout and enjoy.

    Here is Video Tutorial

    Your Blog will not ever has long page again.

    Ok I think This is usefull tricks of you, if use Say Thanks....

    How to remove Blogger Sidebar widget title

    How to Remove title of sidebar widget, Remove Sidebar widget title,remove sidebar widget heading
    Remove_sidebar_widget_heading
    Sidebar usually contains important widgets like Search Bar, Popular Post, Facebook like widget etc. All these widgets have title appearance which is same for all the widgets and that are controlled through your template. So today in this post I will tell you to remove title or heading appearance for a particular widget. From figure you can seen that I have removed the tittle of Facebook like page by making a small modification in blogger Template. you can also easily remove the tittle of any sidebar widget. So lets start the tutorial.


    How To Remove Tittle Of Sidebar Widget:-


    1. In Blogger Dashboard Go to Design / Edit HTML.
    2. Click "Expand Widget Template".
    3. Download the Full template before making any changes in it (More info).

    How To Remove Tittle of Facebook like Page:-

    • Find following piece of code in blogger template.
    <b:widget id='HTML1' locked='false' title='Find us on Facebook' type='HTML'>
    
    <b:includable id='main'>
      <!-- only display title if it's non-empty -->
       <b:if cond='data:title'>
        <h2><data:title/></h2>
      </b:if>
      <div class='widget-content'>
    
        <data:content/>
      </div>
    • If you want to remove title of Facebook like Page then the corresponding code will be.
    <b:widget id='HTML1' locked='false' title='Find us on Facebook' type='HTML'>
    <b:includable id='main'>
      <!-- only display title if it's non-empty -->
        
    
      <div class='widget-content'>
    
        <data:content/>
      </div>
    • Save the template, Now your Facebook widget will shows up with no tittle.

    How to remove Tittle of Subscribe Via Email:-

    • In a similar way you can also remove title of this widget. Just find the code below and remove the red part containing it.
    <b:widget id='HTML2' locked='false' title='Subscribe via email' type='HTML'>
    <b:includable id='main'>
      <!-- only display title if it's non-empty -->
    
      <b:if cond='data:title != &quot;&quot;'>
        <h2 class='title'><data:title/></h2>
      </b:if>
      <div class='widget-content'>
        <data:content/>
    
      </div>
    .
    .
    .

    How to Remove Title OF Blog Archive:-

    • Search for following piece of code and remove the red part from the code.
    <b:widget id='BlogArchive1' locked='false' title='Blog Archive' type='BlogArchive'>
    <b:includable id='main'>
      <b:if cond='data:title'>
        <h2><data:title/></h2>
    
      </b:if>
      <div class='widget-content'>
      <div id='ArchiveList'>
      .
      .
      .

    How to Remove Title OF Labels:-

    • Search for following code and remove the red part of the code.
    <b:widget id='Label1' locked='false' title='Labels' type='Label'>
    <b:includable id='main'>
    
      <b:if cond='data:title'>
        <h2><data:title/></h2>
      </b:if>
      <div expr:class='&quot;widget-content &quot; + data:display + &quot;-label-widget-content&quot;'>
    
    .
    .
    .
    M

    Jan 31, 2017

    How to Postplace adsense below post Title to highest CTR

    why below post title? Because it is the position with the highest CTR (click-through rate). In other words the ad placed there will bring the most money.

    According to the Adsense ads positioning guideline published by Google, the best performing Adsense ad position is above the primary content i.e. above the blog post. This is illustrated by the heat map on the right.

    Placing an ad below post title (above post content) is a not at all difficult. All you have to do is create an ad unit on Google Adsense website, get the code and add it to the specified location in your blog template.


    (You can’t use Blogger’s Inline Adsense or Adsense gadget because it doesn’t have the option to add an ad under post title).

    Here we go,


    1. Preparing Adsense ad code

    Log in to Google Adsense (opens in tab/window) to create a new ad unit.
    For best results choose wide ad size -either 300x250 Medium Rectangle or 336x250 Large Rectangle format. Make sure you assign a new ad channel to it for performance monitoring purposes.

    When the setup is complete, you will be given a code. Run the code through an HTML escape tool to escape special characters in the code. The ad won’t appear if you use the original unescaped ad code.
    Copy the escaped code.

    2. Adding ad code to the template

    Go to Dashboard > Design > Edit HTML.
    Tick the Expand Widget Templates check box on top right of the HTML window.
    Look for the following line in your HTML code:

    <data:post.body/>

    Paste the escaped ad code right above the line, like so:

    <b:if cond='data:blog.pageType == &quot;item&quot;'> PLACE AD CODE HERE </b:if>

    the conditional tag in lines 1 and 3 will make the ad appear only on post pages. If you want the ad to appear on all pages, just remove the lines. Save and view your blog.

    3. Monitor ad performance

    Make sure you monitor the ad performance. Don’t automatically assume it succeeds in increasing CTR without seeing the actual results.

    No two blogs are the same, what works on most blogs may or may not work on yours. If you don’t see positive changes, test again with different ad types, formats, colors and/or placements.

    Enjoy!..................... And Say Thank If Have Doubt Feel Free And Ask

    Jan 24, 2017

    Optimization of ULR parameters for Blogger in Webmaster Tools


    URL parameters help Google to crawl your iste more efficiently and give priority to your more useful content by controlling the parameters that effect the site content. In blogging platforms like Wordpress and Blogspot, there are several parameters, that effect the page content. Famous among them are replytocom, Show comment, comment Page, m and utm parameters. Here are the guidelines to get through all this headache and to make it simoe to optimize URLs for Blogger blogs and enhance your SEO.

    Important Parameters

    To check the parameters Google has found out on your blog, simply log into your Webmasters Account and then click Configurations and then URL parameters. You will see a list of around 7-8 parameters for which you need to specify their behavior. The number of these parameters could be greater if you are using Google Custom Search.

    Some of the Parameters are

    1. showComment
    2. m
    3. commentPage
    4. utm_source
    5. utm_medium
    6. utm_campaign
    7. max-results
    8. updated-max
    9. share

    Parameters follow a URL with a question mark.

    Optimization settings

    You will find Edit and Reset link to the right of each parameter. Make the setting for each parameter one by one as shown.

    Points to Remember

    1. This method will only make crawling easy for Googlebot and will not make any of your pages disappearing.

    2. You need to set Crawl and Effect entries only.

    3. To see the structure of the URL you can click "show example URLs" in the popup window to precheck how the URLs look like.

    4. Effect Paginates here is used for CommentPage and m because both are simple identifiers to show page number for comments greater than 200 in Blogger.

    5. Effect Sorts is chosen for max-results and updated-max because both sorts the page content in order of time and date.

    Reductoin of crawl errors

    Yes, it does reduce the crawl errors. Most of the errors are caused by duplicate URLs or due to absence of canonical link attributes. This methods makes it extremely easy to control the URL structure of your blog within your webmasters account.

    How to Create Successful Youtube Channel step by step

    How to Create Successful Youtube Channel step by step

    A tremendous amount of traffic that flows through internet every year is by users watching Youtube videos. Youtube has led to an enormous success for many people, especially singers. Many of the bloggers have also managed to harness the power of Youtube adding video content to their posts. This gives the readers a fresh way to view the blog and in turn attracts the traffic directly form Youtube.
    So you are thinking of starting a youtube channel of your own soon. The following steps will help you to stay on the right path that will lef you to success.

    1. The Vision

    So What is your channel (my channel is siriplaza) ygoing to be about? There are so many channels on the subject you have in head, though your subject is unique. Thinks of an uniqque angle, a unique twists that will make your channel different and offer something more unique to viewers. Well, before starting take a moment to figur out if you will need to step up your editing software or buy a new camera. Another important question to ask yourself is, "How often will I be uploading videos?" Set realistic goals based on your lifestyle.

    2. Picking a Name

    Before you start working, take a look about top featured videos and skim through the usernames. Some are long,some are short, some are generic, some are catchy and memorable. Think about your channel, the direction it may be lead in the future and write down names that are short and sweet that suits your channel the most. Then seek out other's opinion on which username you should use. Ask your friends, family or take to message boards a chatrooms for more opinions to help you decide.

    3. Perfecting your Appearance

    What's the way you want your audience to view your channel and your videos? What flare, style or uniqueness would you like to come across in your videos, or will they be any at all? Sometimes it's best to let more skilled individuals handle the more involved editing tasks. Youtube channel background is also seen by users from time to time. The background area should reflect the content you are providing. Your avatar can reflect your username and be branded with a logo that you might use in your videos.

    4. Marketing your channel

    Once you have your channel setup and a few videos for users to watch, bring awareness about your channel and videos is should be top priority. Marketing is all about presenting your content to as many people as possible while targetting those who you know might be interested. You must have to create a Fb fan page and Twitter profile. These two social networking sites will allow users not on Youtube to be exposed to your channel. Do not hesitate to interact with users on FB and Twitter in order to gain fans and followers.

    The above can also be done in youtube. Find channels and Videos that are in the same genre as yours or find videos that you know its viewers might have an interested in videos. Subscribe to those channels, comment on those video. Let others know about your channel. By the way you comment that you know what you are talking about. A sneaky trick is to leave a comment which attracts people. This will expose more users to your comment and to same extent your channel. Excessive commenting or coments that say "check out my channel" will get marked as spam and could lead to you channel being suspended.

    5. Consistency

    Take time to know you will have available. If you have all the time in the world, make a video 5 times a week, if you don't, find out how much time you can set aside each day of week to put towards your channel.Slowly your viewers and subscribers will slowly begin to trust and view your channel. Subscribers will expect to get entertained or to get educated by your videos.

    It is important to stay consistent and put out videos at the same time each week. Never let your channel, your videos comments, your twitter and FB fan page stand still. Continue to put in a little time for each component regularly. Make small achievable goals as you pass one. Stay focused and be persistent and success, it just comes.

    Advanced Indexing status reporting feature for Webmaster Tools

    As we all know that at present Google is the largest search engine in the world. Now all bloggers have only one concern in their heads and that is "Is google indexing my site?". That is understandable since most of their website traffic comes from google. So being un-indexed by Google will have a huge effect on your pageviews and traffic. To put some of the concerns regarding indexing, Google has introduced a new Index Status feature in Google Web Master Tools. This feature will let webmasters know how many of their pages have been indexed, crawled and so on!

    To find this information :-

    1.Log into your Google Webmaster Tools account.
    2.On the home page, click on the site for which you want to see the indext report.
    3.Then click on the health option on the left side of your dashboard, and select Index Status from the avaiable option.
    4.Then, you will notice two tabs,Basic and Advaced.

    Basic Tab :- The basic tab shows a graph which tells you the number of pages of your site have been indexed over time. It displays up to one year of stats (data). Then legend will let you know number of pages that are currently being indexed. Google says that this information is accurate doesn't include non-canonical URL's so, if there are more than one URL's pointing to the same content or if there is any duplicate content present, then it will just be counted as one page (instead of multiple pages.)

    Google also admitts that this data lags by around one week. Is the graph is steadily growing up there is nothing to worry about cause it means that your new content is being recognized by google and if the graph remains constant or falls down inspite of yout addition of new content, then you might want to look into the advaced tab.

    Advanced Tab:- This tab gives more insights into how Google has been treating your website. In addition to the graph, you can see the 1. Ever crawled 2. Not Selected 3. Blocked by Robot graphs

    Usefulness of this Data :-

    Thinking about the usefulness of this data, right? Here I go. This data could be useful for debugging purposes to see whats wrong with your content (website) and why you are not getting any traffic and views. An increase in the number of Total Indexed and Ever Craled pages means that your site is on the right track and Google can access your content.

    On the other hand, if there's a sudden drop, it means that Google having trouble reaching your website. It could be because your webserver is down or you might have added a sitewide 'no index' tag instead of adding it one just one page. A large no. of not indexed means there are problems with canonicalization or there's a lot of duplicate content on your site. This means that you must make efforts to reduce the duplicate content on your site and even non-canonical URL's.

    How To Postplace adsense below post title to highest CTR

    why below post title? Because it is the position with the highest CTR (click-through rate). In other words the ad placed there will bring the most money.

    According to the Adsense ads positioning guideline published by Google, the best performing Adsense ad position is above the primary content i.e. above the blog post. This is illustrated by the heat map on the right.

    Placing an ad below post title (above post content) is a not at all difficult. All you have to do is create an ad unit on Google Adsense website, get the code and add it to the specified location in your blog template.

    (You can’t use Blogger’s Inline Adsense or Adsense gadget because it doesn’t have the option to add an ad under post title).

    Here we go,


    1. Preparing Adsense ad code

    Log in to Google Adsense (opens in tab/window) to create a new ad unit.
    For best results choose wide ad size -either 300x250 Medium Rectangle or 336x250 Large Rectangle format. Make sure you assign a new ad channel to it for performance monitoring purposes.
    When the setup is complete, you will be given a code.
    Run the code through an HTML escape tool to escape special characters in the code. The ad won’t appear if you use the original unescaped ad code.
    Copy the escaped code.

    2. Adding ad code to the template

    Go to Dashboard > Design > Edit HTML.
    Tick the Expand Widget Templates check box on top right of the HTML window.
    Look for the following line in your HTML code:

    <data:post.body/>

    Paste the escaped ad code right above the line, like so:

    <b:if cond='data:blog.pageType == &quot;item&quot;'> PLACE AD CODE HERE </b:if>

    the conditional tag in lines 1 and 3 will make the ad appear only on post pages. If you want the ad to appear on all pages, just remove the lines.
    Save and view your blog.

    3. Monitor ad performance

    Make sure you monitor the ad performance. Don’t automatically assume it succeeds in increasing CTR without seeing the actual results.

    No two blogs are the same, what works on most blogs may or may not work on yours. If you don’t see positive changes, test again with different ad types, formats, colors and/or placements.

    Enjoy!..................... And Say Thank If Have Doubt Feel Free And Ask

    Twitter Delicious Facebook Digg Stumbleupon Favorites More